Sketchbook Walk

I went on a sketchbook walk for Exercise 2 and found four viewpoints that I wanted to capture, I wanted a variety and made some quick sketches of a woodland walk that led into a town/ busy area. I wanted to expand out into a more modern landscape with this exercise as well as a traditional, natural landscape and branch out and test my abilities of depicting a scene.
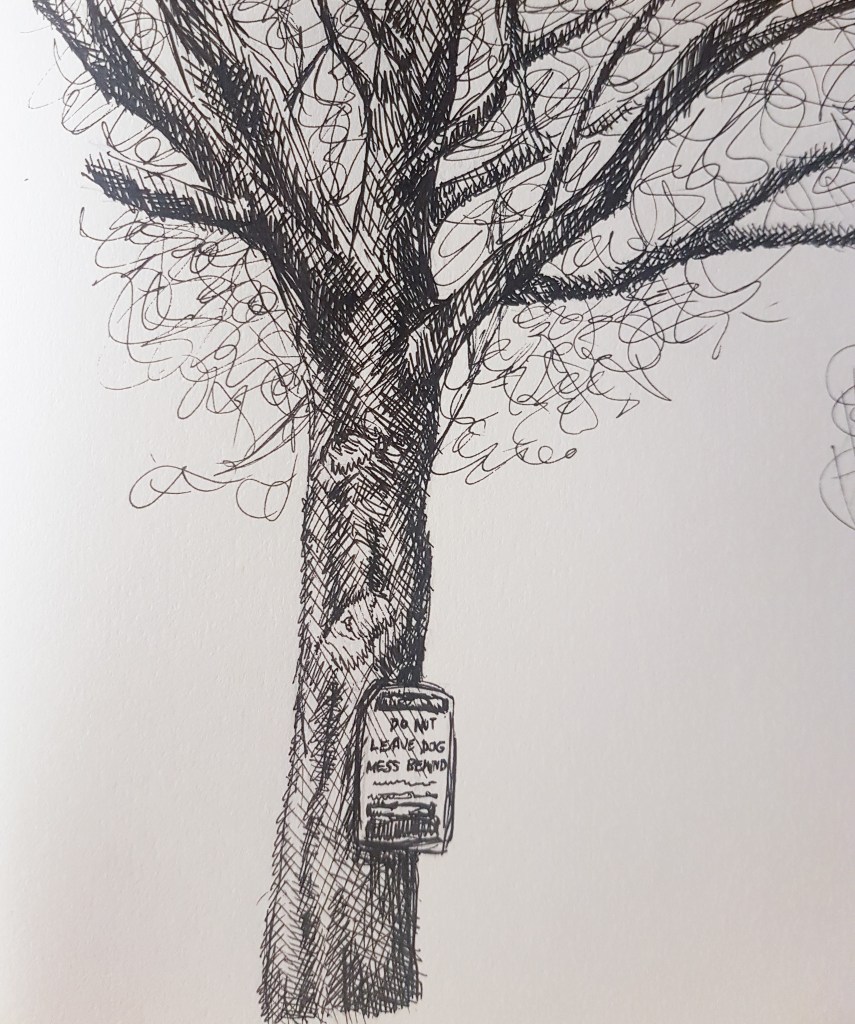
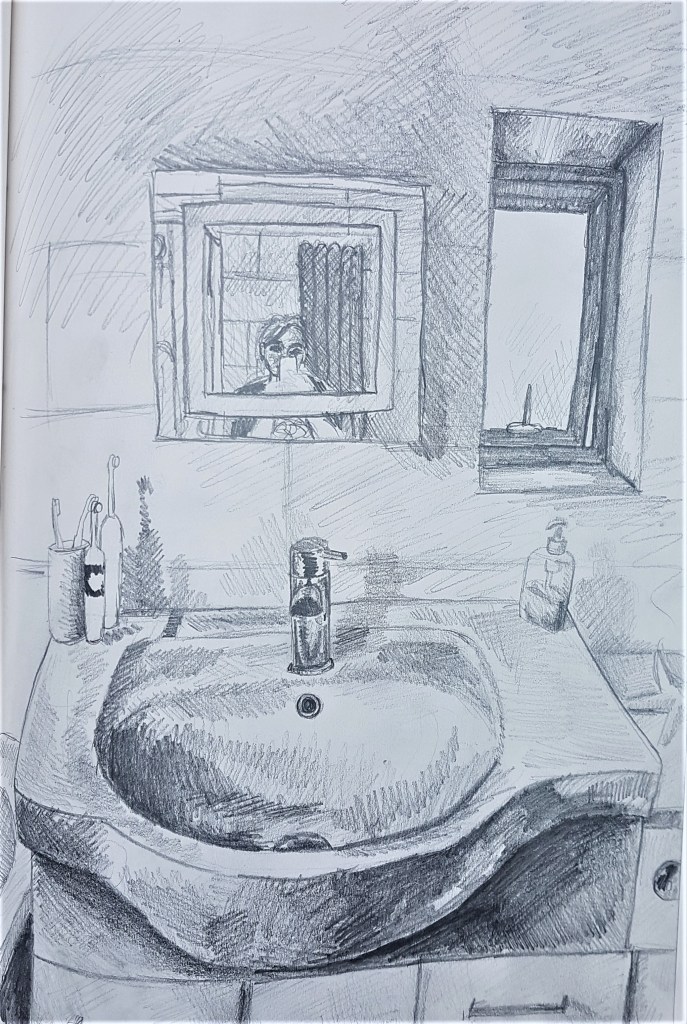
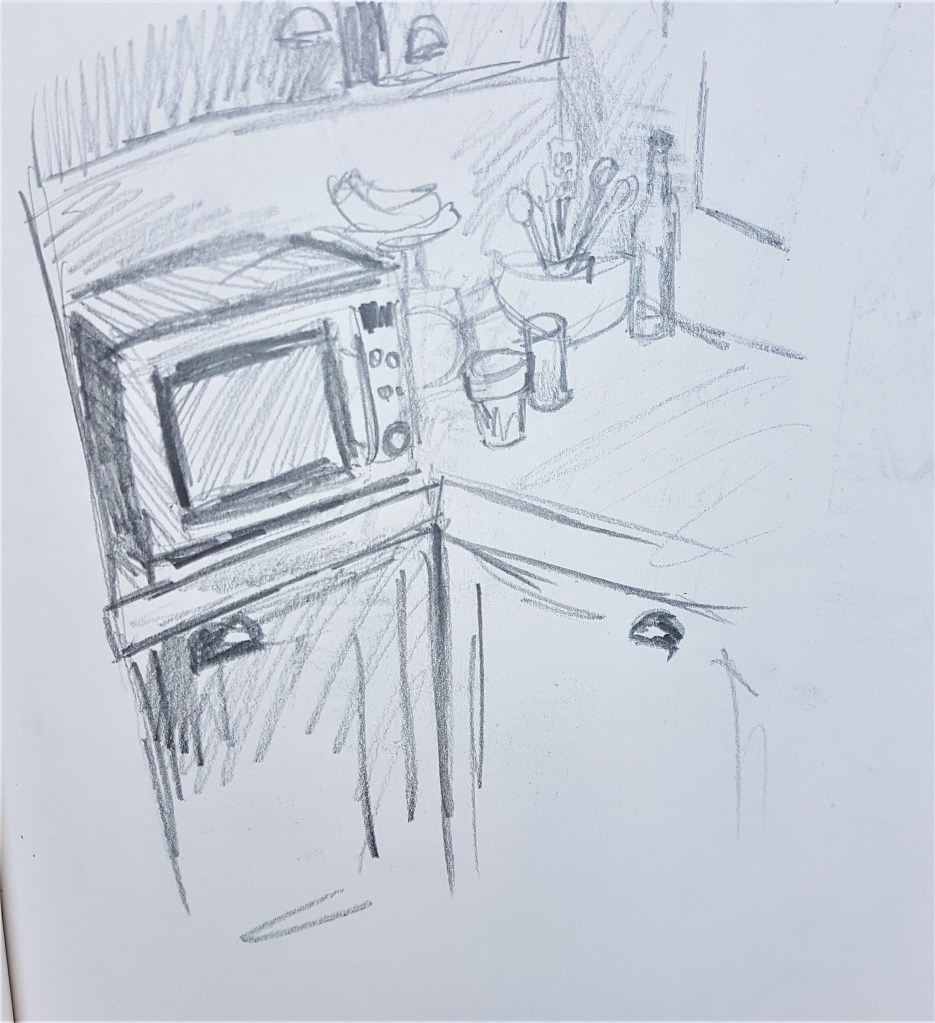
Sketch 1

Sketch 1 with notes of weather and other observations

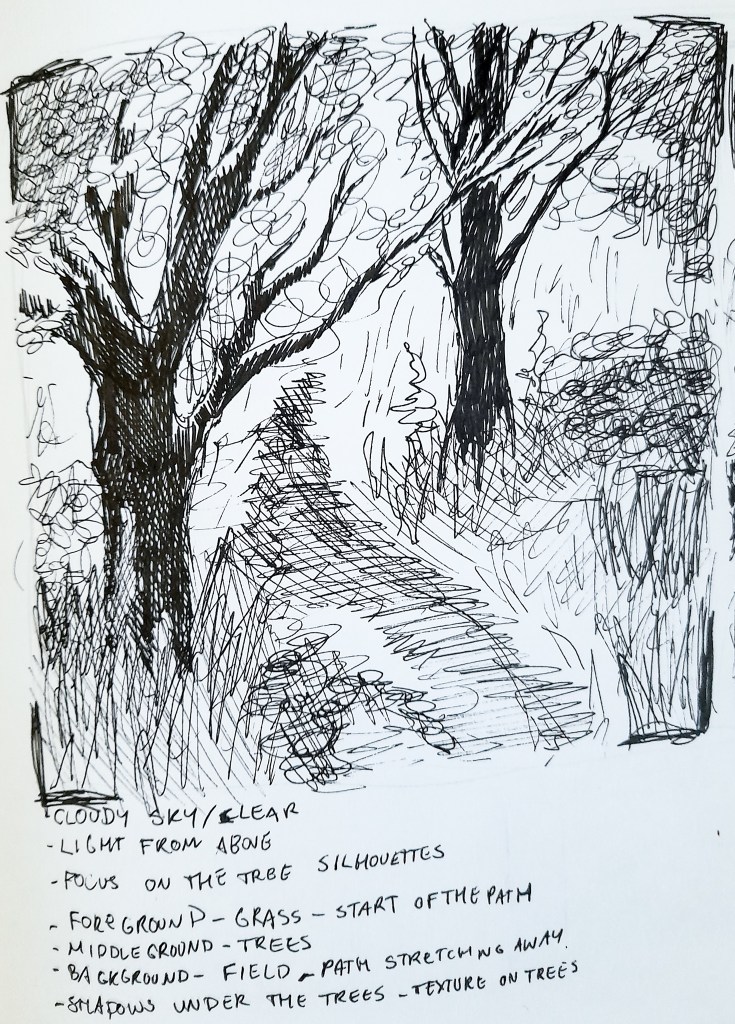
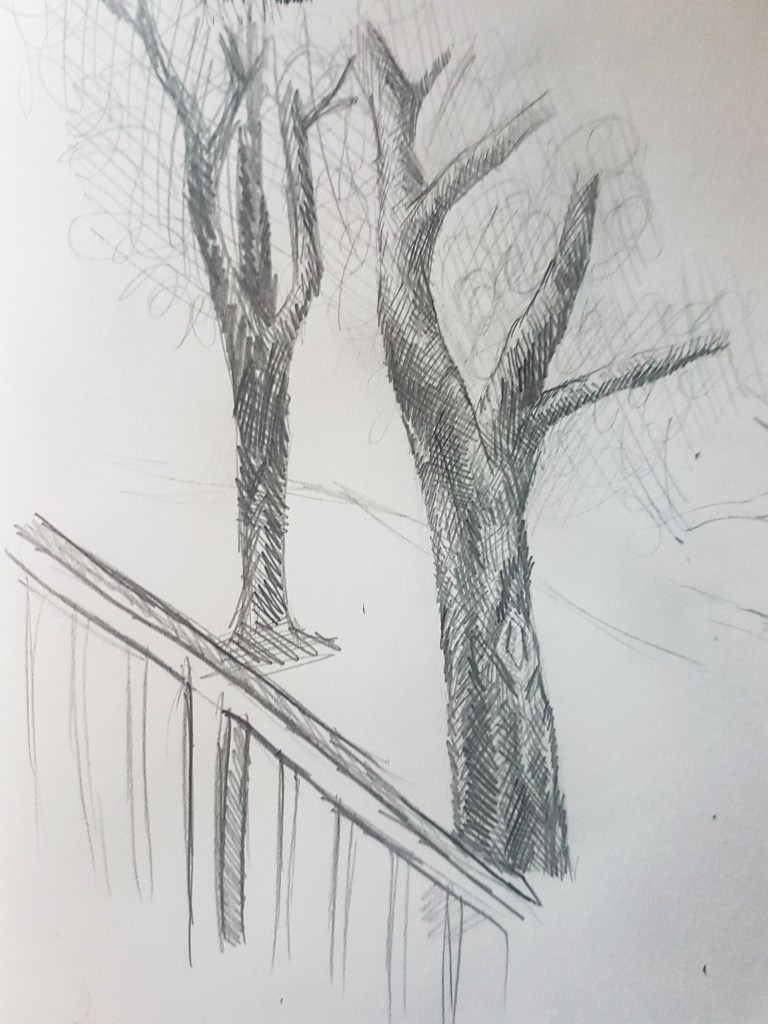
I spent around 10 minutes on this sketch and I really like how I captured the shape of the trees. One aspect I really enjoy about Part 3 is drawing the shapes and figures of trees. I loosely squiggled in the foliage before attempting brambles, bushes and the path. I am quite happy with the fore ground and middle ground, but the background could definitely use some work. The lighting at the time made it difficult to depict a lighter background compared to the darker foreground, as it wasn’t something I had quite tackled before. I hate how the path came out, it doesn’t work with the perspective of the drawing and looks quite odd, especially since its in the centre of the sketch. I wish I had focused on the tone of the path, making it darker at the bottom of the sketch and creating a lighter gradient as it reaches out of the trees. I wish I had more time to focus on this scene and get it right and more accurate depicted.
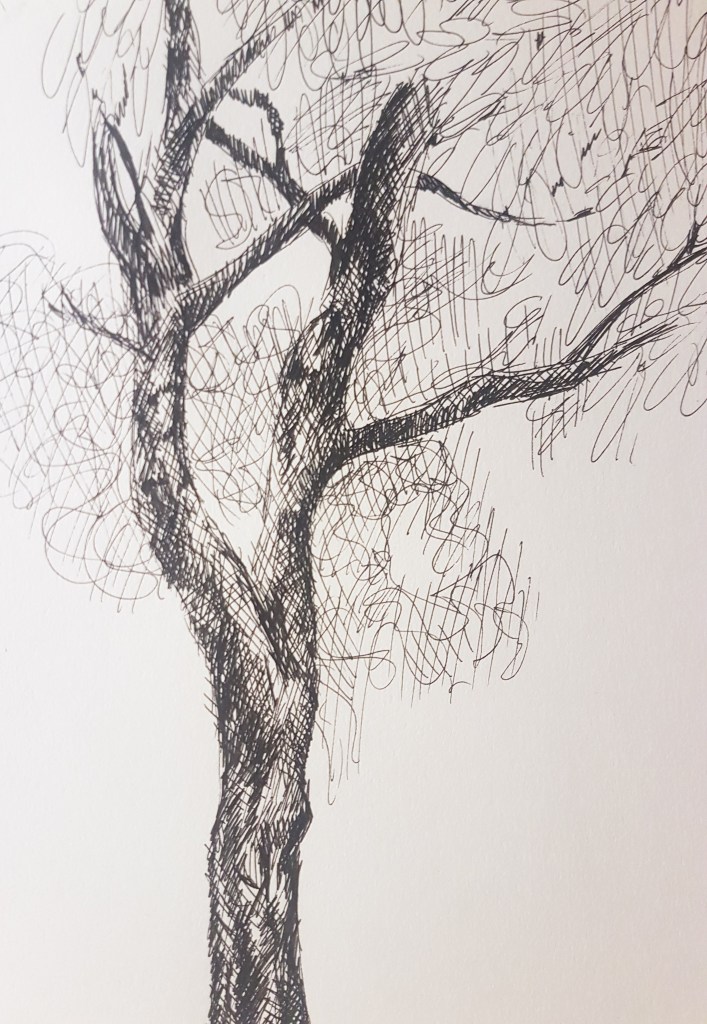
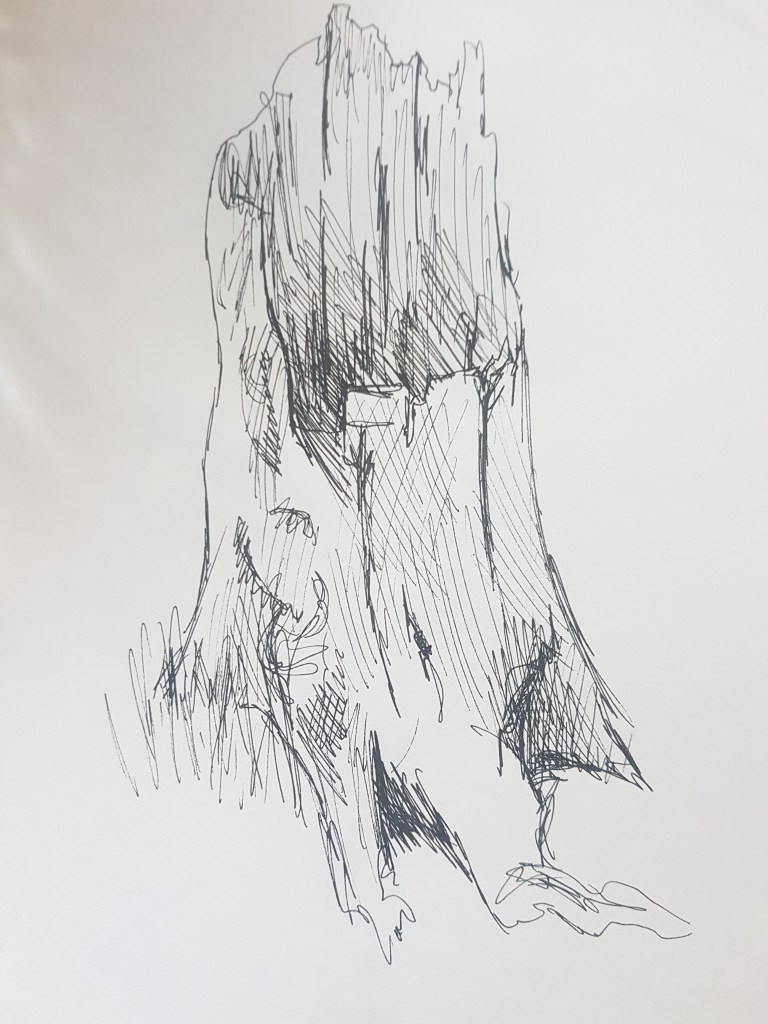
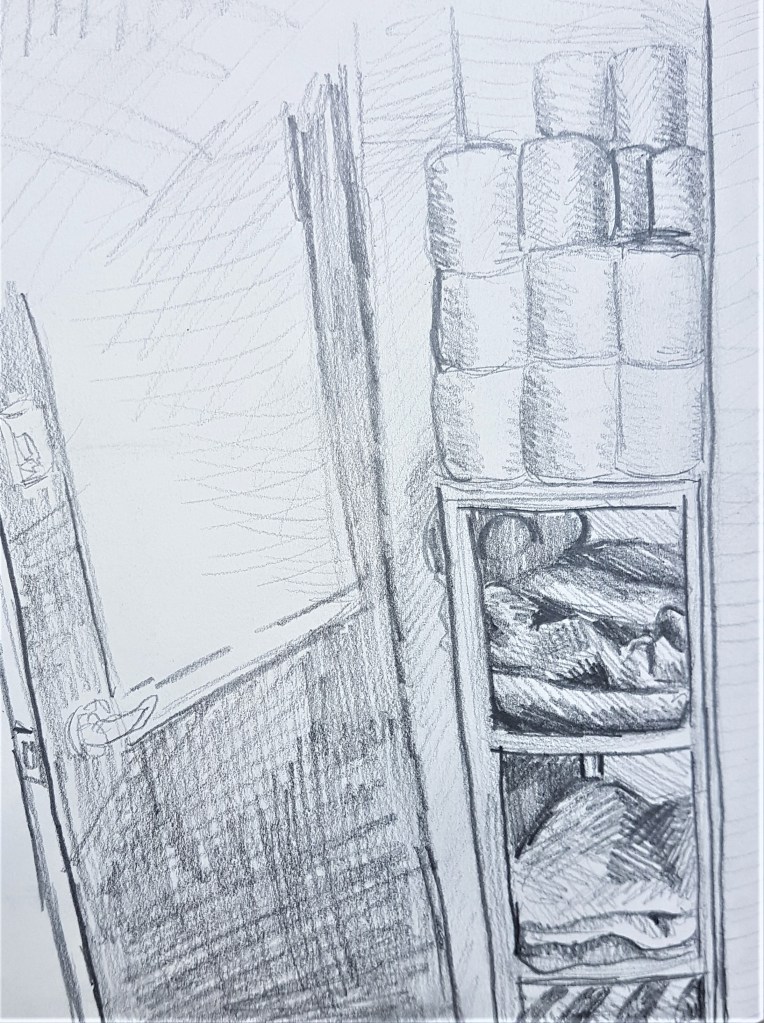
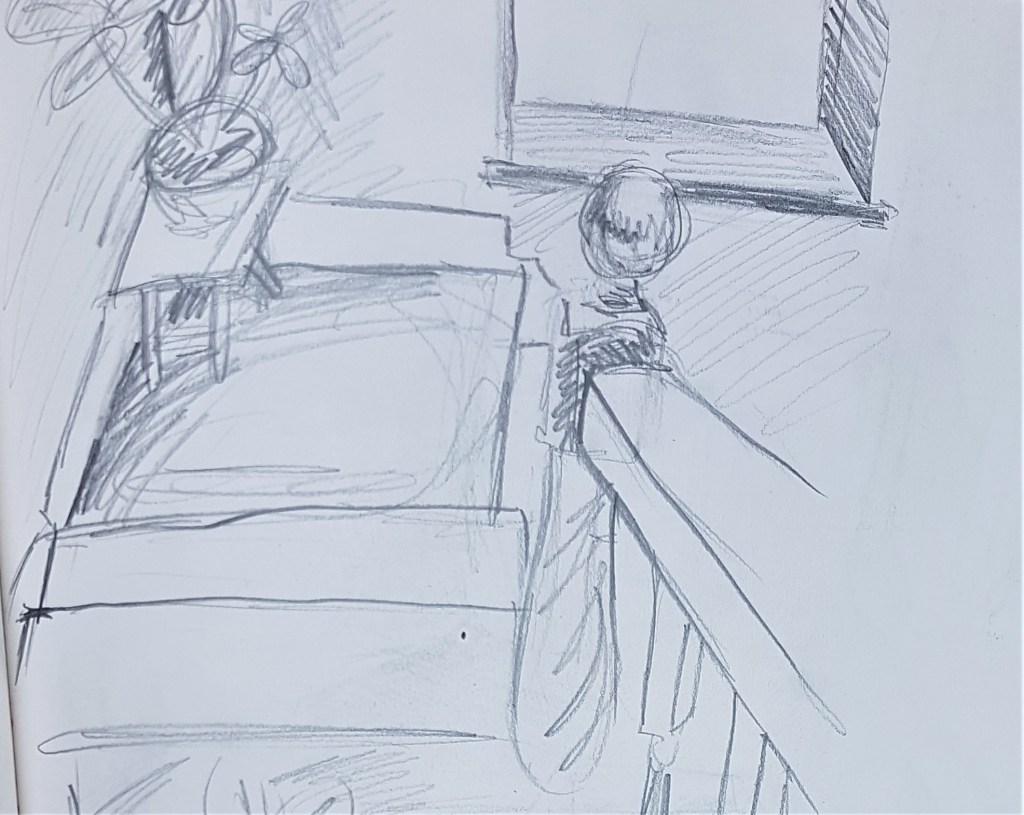
Sketch 2

Sketch 2 with notes of weather and other observations

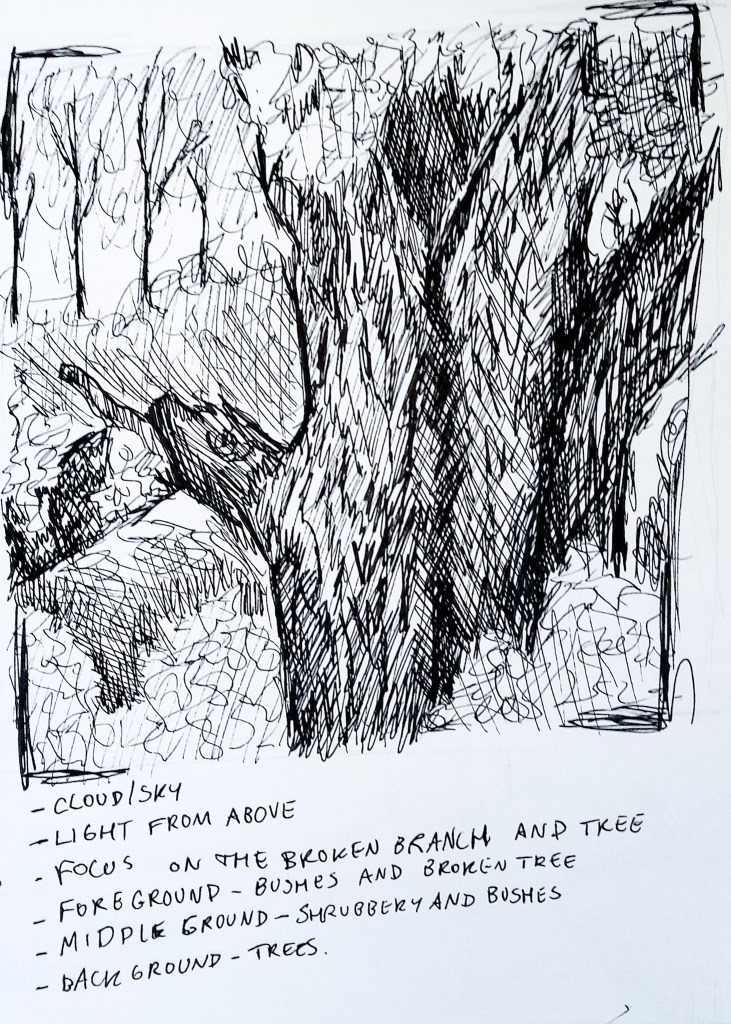
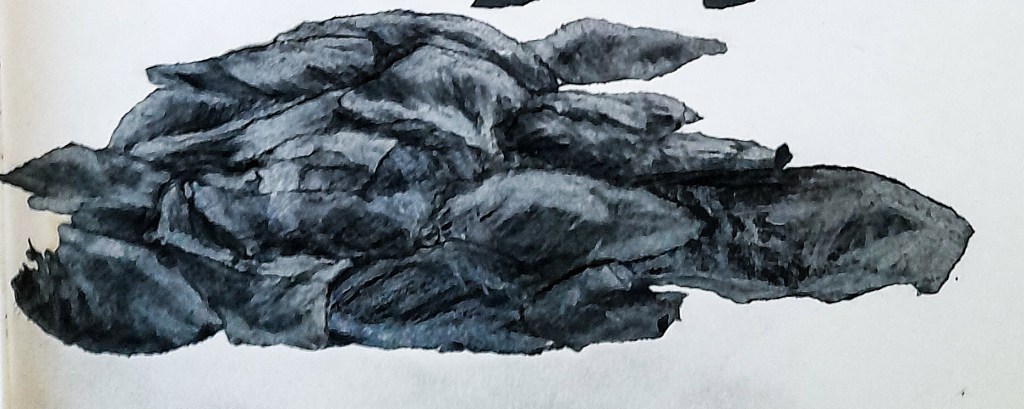
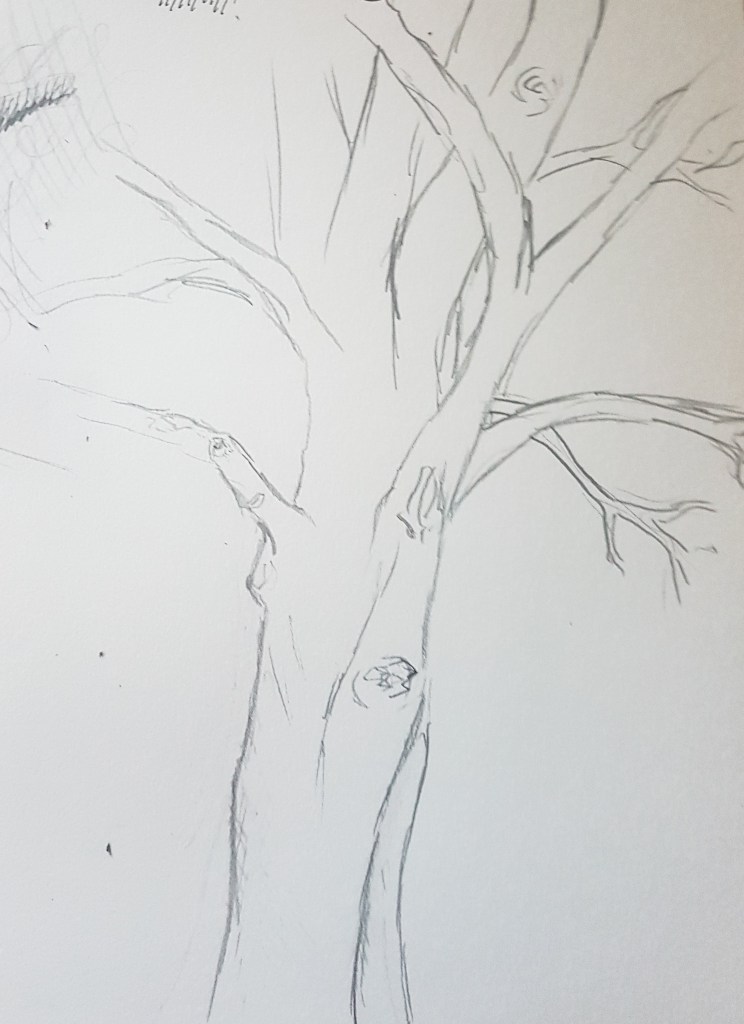
This sketch was of a broken tree within a woodland. I wish I really embraced using a fine liner pen and went for it in darker areas, because the sketch ended up with lots of medium tones that almost blend together. If it weren’t for the harsh outline I used for the tree it would be hard to tell what I was trying to depict. I wish I darkened the tree more to help create an easy divide of the foreground and background for the viewer to see. It was a quick sketch and helped me to focus on the composition but I think more time would help me to create a more detailed and visually stimulating drawing.
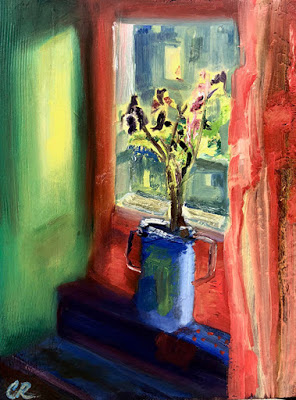
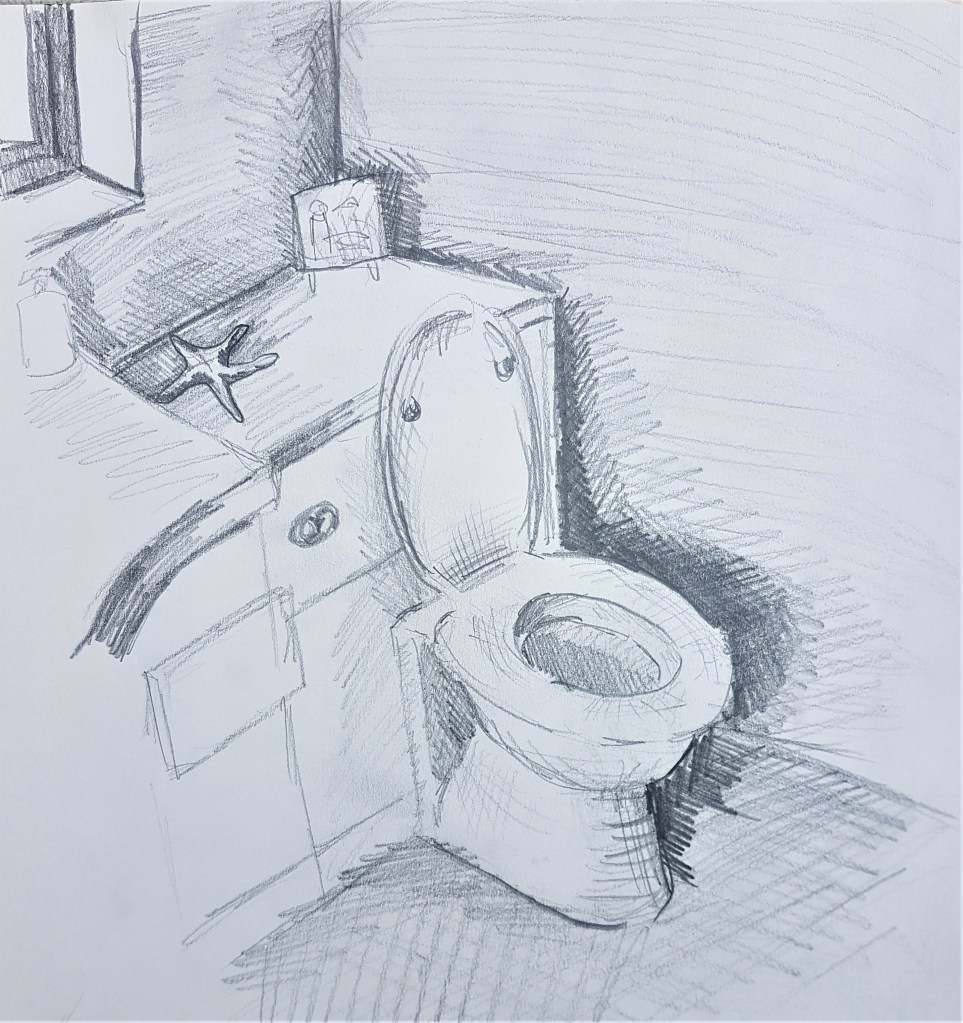
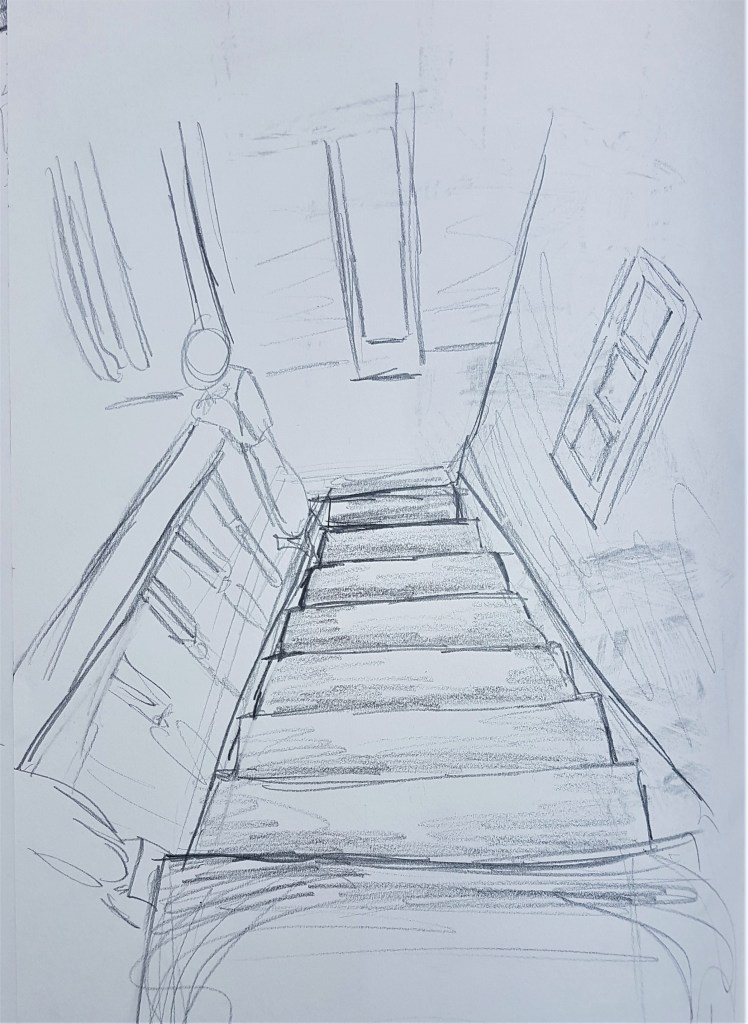
Sketch 3

Sketch 3 with notes of weather and other observations

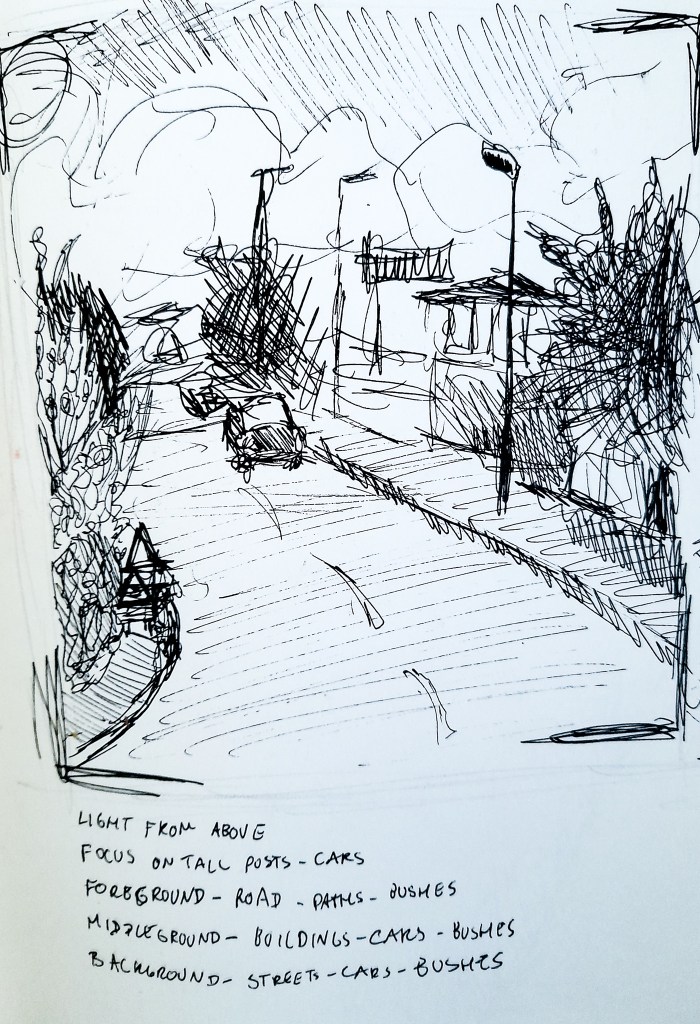
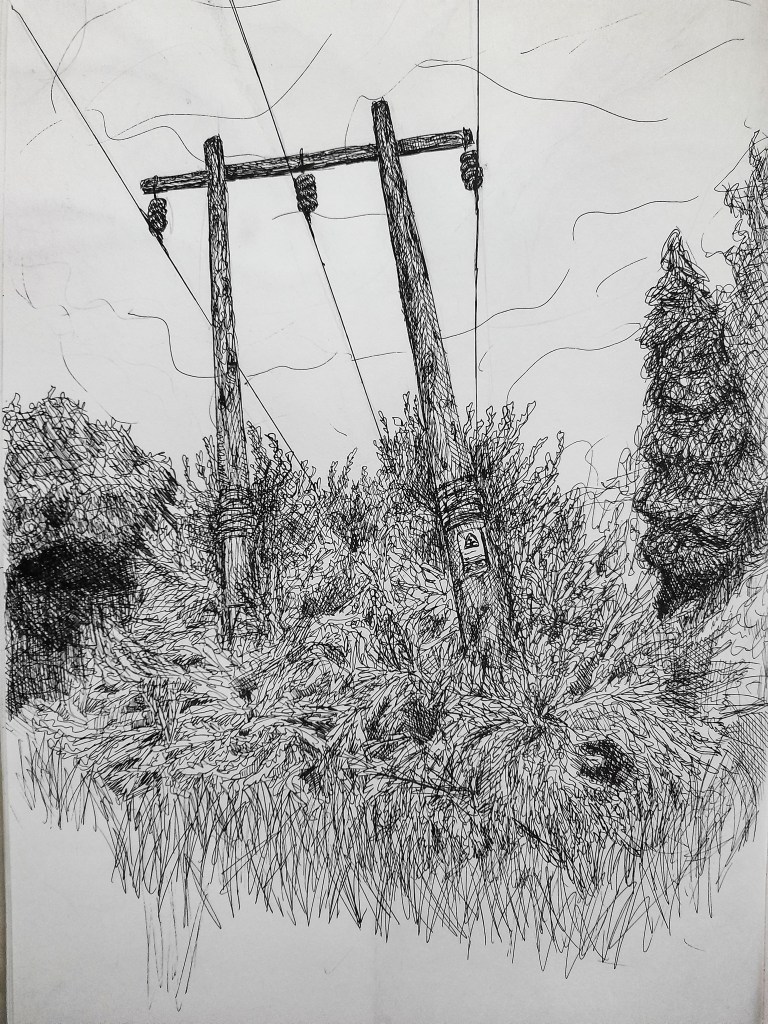
As my walk continued I came to a road which I thought could be interesting to draw and be a change of scenery. I wanted to test myself with a new view outside of a natural landscape and I’m happy with what I came out with, with a 10 minute sketch. I love how streetlights can add so much to a contemporary landscape composition with their straight lines which juxtapose the curvy lines used for the trees, road and sky. I wish I had filled out the space with buildings more before the skyline to build up the composition and tone a bit more. The perspective is a bit skewered, due to my lack of experience drawing roads and and paths in a landscape. So moving forward that is an area for me to really focus on when it comes to townscapes and landscapes which include roads.
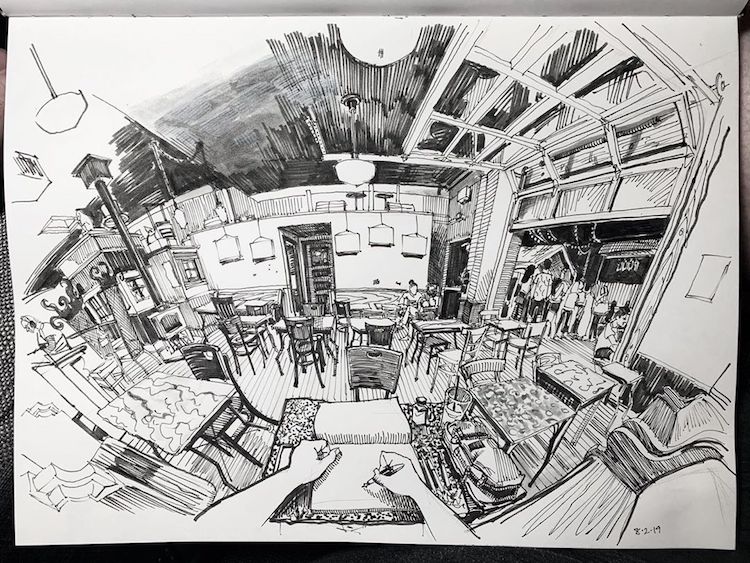
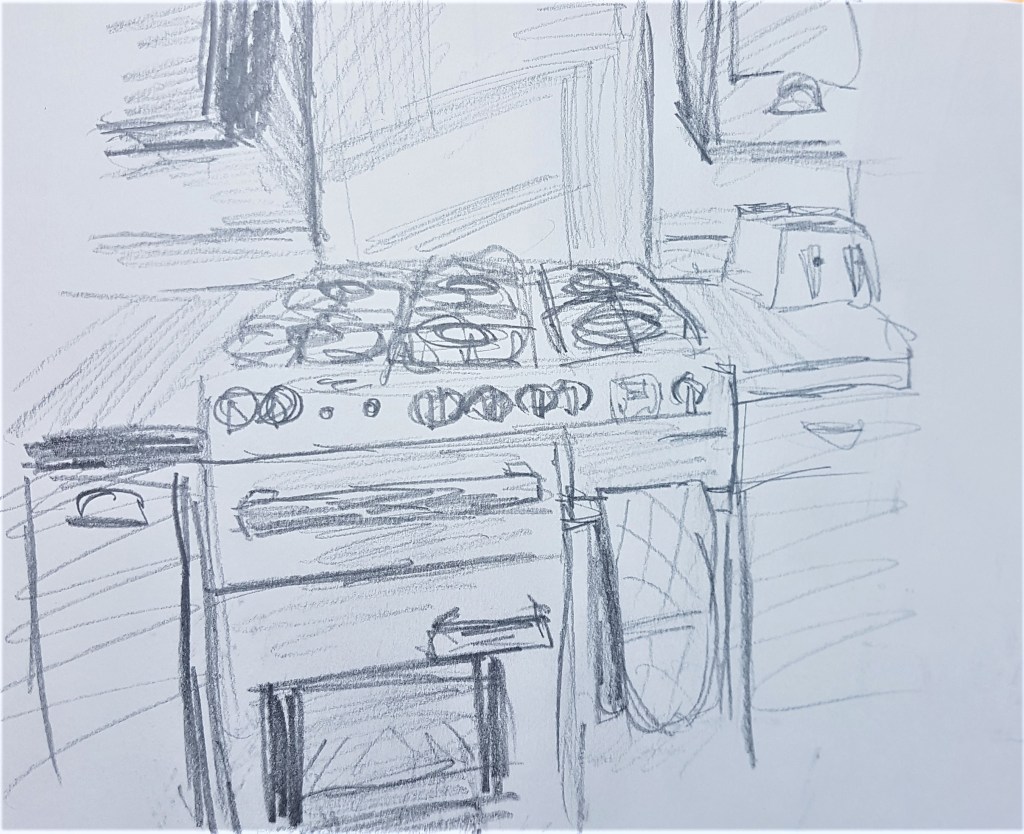
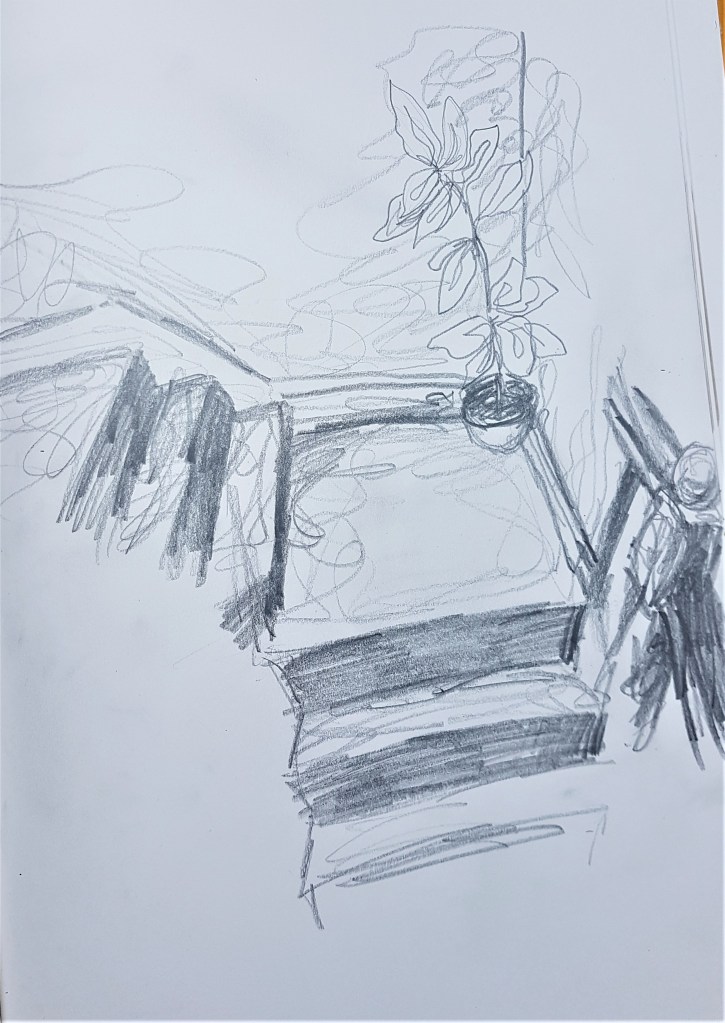
Sketch 4

Sketch 4 with notes on weather and other observations

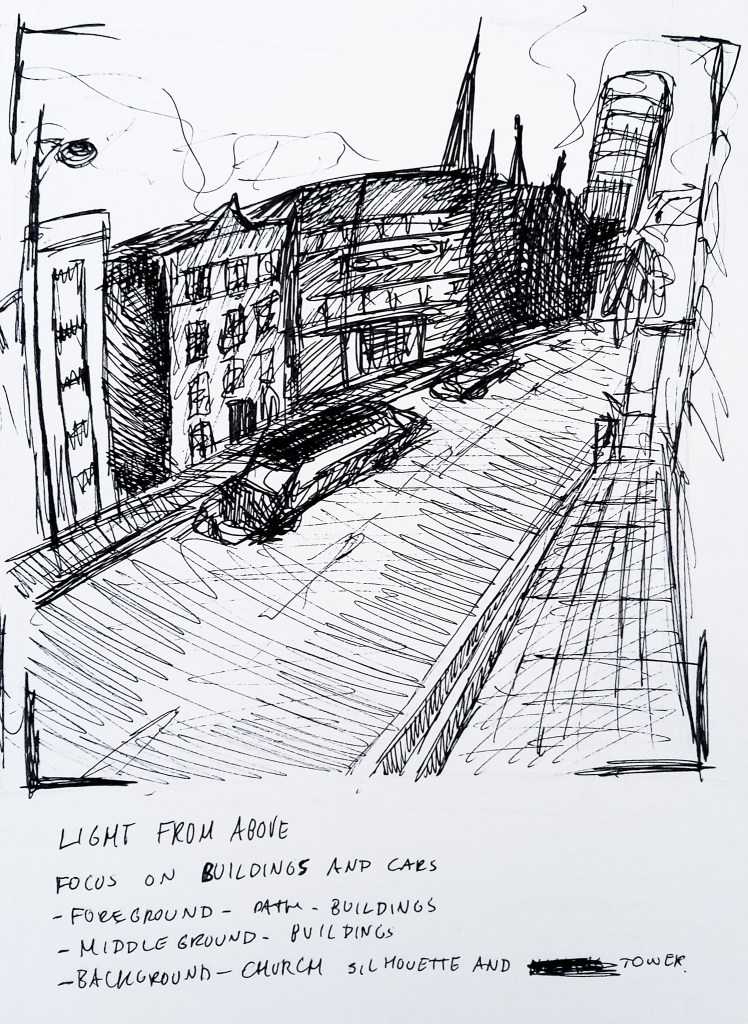
The perspective is all over the place in this sketch. The buildings curve and don’t match the angle of the road at all so I need to work on making my perspectives and angles match in townscape drawings. Maybe if I had more time I could get it right, but it’s also a skill that I can get the hang of as I continue to draw and practice my drawing skills when it comes to landscapes. I think its easy to say that this is my least favourite sketch out of the four, and I have lots of areas to improve. Like the exercise says, quick sketches do allow me to really think about my composition and space, but I have a lot of work to do to improve on accurately capturing a landscape and townscapes.

Moving Forward

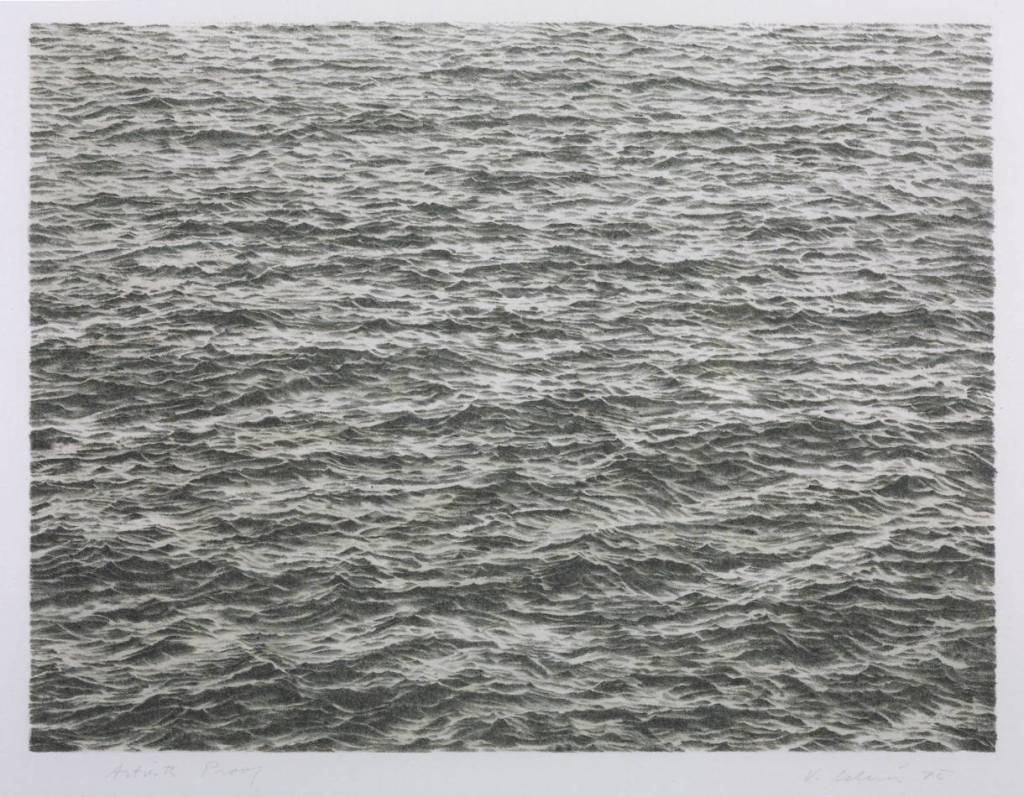
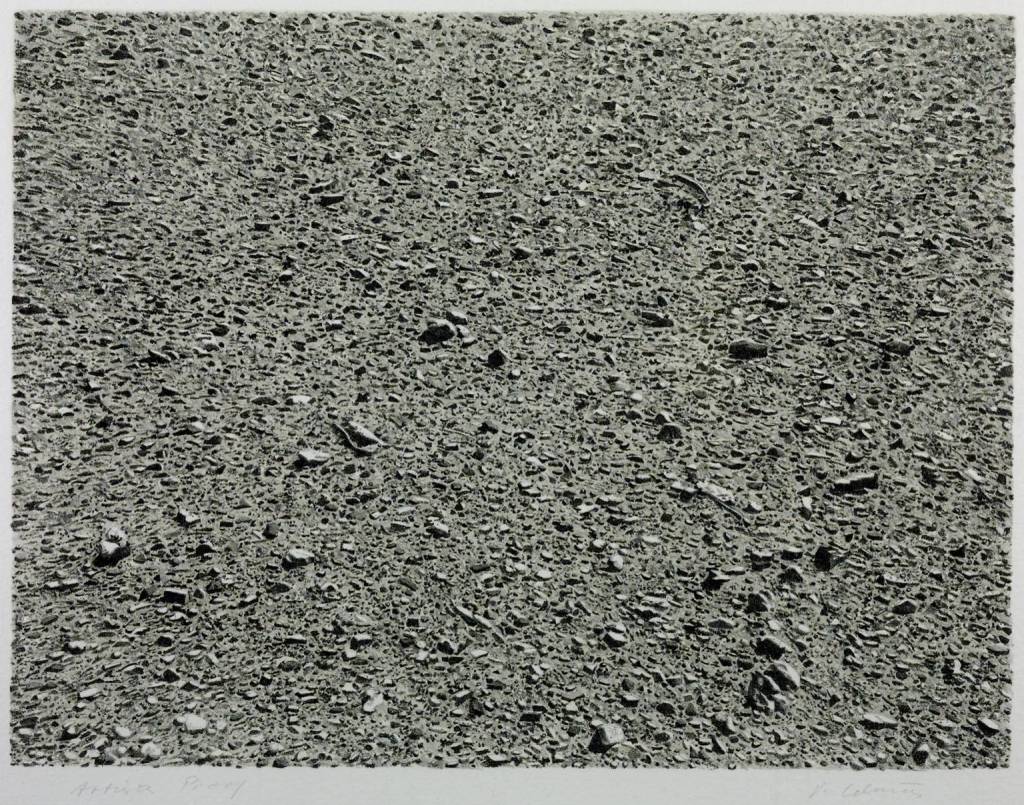
I really want to work on my use of perspective and accurately capturing a composition. I need to work on using my tone to help differentiate the foreground, middle ground and background effectively in my work. I need to be more confident in creating darker areas and also in leaving areas with no markings to create highlights. I should really explore that with more quick sketches and by also taking my time to create something detailed and more intricate. I could also expand my knowledge and use of tone by focusing in on areas of texture as well, like with my previous exercise and my research on Vija Celmins.

Cloud formations and tone

I approached this exercise the same way I did looking at tree’s. Areas of tone, light and dark. The texture of clouds are unusual, very soft and different to other natural textures found in natural environments. They are also very hard to replicate and I tried various methods while tackling the difficult task of drawing an accurate representation of such a texture.

Method 1- Light on dark.

Drawing 1 (Top)- White pencil on black paper
Drawing 2 (Bottom) – White and blue oil pastel on black paper

For my first attempts, I focused on the lighter areas of the clouds, and hoped that this approach would best highlight the soft texture I wanted to imply on paper. I think I did well in showing areas of tone and the shadows of the cloud in Drawing 1, however it wasn’t quite there in realism. I narrowed this down to the lack of blending, as my pencil lines are visibly clear, and are quite sharp with my use of line. I think that my first attempt isn’t bad for a sketch and its clearly a cloud.
I decided to try a softer approach and blend my areas of tone in my second drawing, by changing my medium to oil pastels. Oil pastels were easier to blend, and I used blues to help highlight the shadows. I think I captured the highlights best at the top of the cloud, the areas of light and dark are clear but still blended to create a soft, cloud-like texture. I think I lose this in the middle where the areas are mixed and not well defined. I think more clear highlights of white were needed to help define the cloud. To improve on this, I should take time to really evaluate the areas of tone, and blend my colours accordingly. I blended too much in the centre, however I think this is a more accurate attempt than my previous one, and shows a more realistic approach to the soft texture of a cloud.

Method 2- Ripping paper

Drawing 3- Ripped black paper with white pencil, stuck in sketchbook.

When sticking in my previous drawing, I noticed that the ripped edges of my black paper had an interesting effect, and created a soft layered texture, similar to a cloud. I wanted to look into this further and explore this new idea I stumbled across. I began by ripping up some pieces of black paper, and organising it into a cloud-like shape, having the lighter areas created by the rips facing upwards to create a highlight. I thought that the black paper looked a bit too dark and I went in with a white pencil in order to try and create a highlight for it to look more like a cloud.
This worked well to add highlights and depth to the ‘sketch’ and create a more 3D effect than a 2D random collage. The white pencil definitely helped to make this more of a cloud. I am happy with how this came out but it didn’t end up with that soft, cloud texture I was hoping for, but it does look like a cloud. Maybe in a mixed media piece this could work well, especially with white paper and combined with my previous oil pastel attempt. However for the detailed sketches that I’m exploring with Part 3, I don’t think this is something that could work moving forward.

Method 3- Red pencil

I went back to a more traditional approach, this time on white paper. Using tonal pencils, I picked our a warm brown/red colour for a neutral, tonal colour palette. I think tonal pencils could work well for a varied colour palette while also not being too much.
The pencil was very soft and easier to blend, but I still had the problem of my strokes and lines being visible and creating a harsher approach than a softer one. I like how it came out, the shapes and areas of tone being present in my drawings (my second attempt of ‘Drawing 5’ coming out much better than ‘Drawing 4’). I feel this could have came out more effectively had I lightly shaded in the sky, and left the tops of the clouds completely white for that bright highlight that clouds have. I could keep this in mind for my future approaches to a sky in my landscape drawings. I think I definitely grasped the shapes of clouds in ‘Drawing 5’ as ‘Drawing 4’ came out as lump rather than a cloud.

Moving forward

I am happy with this exercise, however I clearly can improve in my drawings of clouds. I think this is something I can work on as I move through more exercises and will pick up with lots of practice. I would like to eventually do a drawing within Part 3, looking at tonal drawing and using that neutral brown colour palette along side blacks and whites. I think that could have a very interesting affect and create an atmospherical drawing. I would like to continue using a fine liner for now as well and really develop my skills with that drawing medium I’m not quite yet used to, and really explore how it can create an aesthetic drawing style. I should sit down and really look at textures, and maybe take a closer look like Vija Celmins does in her work, somewhere down the line.

Artist Research -Vija Celmins and drawing natural elements

Ocean 1975

Ocean 1975 Vija Celmins born 1938 Purchased with assistance from the American Fund for the Tate Gallery, courtesy of the Judith Rothschild Foundation 1999 http://www.tate.org.uk/art/work/P78336
Celmins, V. (1975). Ocean. [dry point on paper] Available at: https://www.tate.org.uk/art/artists/vija-celmins-2731 [Accessed 13 Aug. 2020].

I love the simplicity of her composition combined with complicated details. She captures the movement and shape of the water beautifully using fluid lines which gesture towards the natural form of the seascape. The composition is simple, with a magnified view of the sea, the focus lying on the texture created by Celmin’s use of tone. The texture is emphasised by the tone, created with a strong focus of areas of light and dark. I could try and create a detailed focus on the tone of my pieces, maybe create an interesting composition by keeping a tight, focused view of the natural landscape rather than a broad one. By keeping the subject matter focused and concentrated on one type of natural form, I could create an interesting piece that stands out to the viewer as this piece does so well. Her work can be quite abstract from afar but still recognisable as a natural form.
The monotone works well to emphasise the texture and keep the focus on the form and tonal aspects of the natural seascape . I have been working with a monotone palette for my sketches so far in Part 3 and I would love to continue exploring this, I find by keeping a monotone approach of tone and texture it allows the shapes to really pop in my drawings. Natural textures are very random and complicated compared to man made textures, and are hard for me to accurately portray, so I have been staying focused on the natural shapes within a landscape than the texture. I could try to begin developing a focus within my drawings on the texture of nature that can be observed everywhere.

As Celmins describes in the suggested video on Vimeo, her work is not copying but is ‘Re-describing’ which I feel is important to take from her discussions about her work and applying it to any art looking at natural form. I feel with drawings you’re never going to get the texture of tree bark or all of the blades of grass accurate and precise. So approaching your work as a retelling of it with your medium choice is a good approach in not getting too caught up in all the fine details.

Desert 1975

Desert 1975 Vija Celmins born 1938 Purchased 1999 http://www.tate.org.uk/art/work/P78337
Celmins, V. (1975). Desert. [Lithograph on paper] Available at: https://www.tate.org.uk/art/artworks/celmins-desert-p78337 [Accessed 10 Sep. 2020].

This piece again, is just a snippet of a larger view, and when gazed upon the viewer cannot help but to imagine the broader picture of the landscape, horizon and the sun beaming down. Again a huge emphasis on areas of light and dark to make this piece come together work so well. What I really like is that there is no clear focal point, your eyes just gaze across the piece to different areas, drawn to the bigger areas of shadow being cast by the larger rocks. I think its a unique approach to landscape which shows skillmanship and the importance of compositions which don’t necessarily have a narrative or traditional landscape composition.

Moving forwards

For my drawings I could think about trying to focus on a smaller area with the focus on detail and the texture nature, rather than the ‘scene’ of nature. I want to take time to work on textures of numerous natural objects, like my next exercise looking at clouds, and focus on depicting an accurate texture that adds to the realism of the landscapes I want to ‘re-describe’. I love Vija Celmins work and I would love to incorporate some of her style into my work, by keeping to a monochrome palette and really focusing on my use of tone, boiling it down to areas of light and dark to effectively present my landscapes.

Exercise 3- Study of several trees

I really wanted to capture what the exercise talks about in the first paragraph, to capture the ‘most striking feature’ . I wanted a point of interest that could stand out against the trees within my composition but also help draw the viewers gaze in and then out to the trees surrounding this focal point. I thought this could help create an interesting drawing that doesn’t feel to crowded with all the similarities present in the structure of trees. I did think about maybe incorporating a contrast with my choice media of a fine liner pen with oil pastels, but I ended up preferring the more simplistic take with loose lines forming a monochromatic, observational sketch. I found a good composition on my walk, an electrical pole surrounded by trees and decided to get to work on this exercise.

Drawing in A3 sketchbook in black fine liner pen.

I am happy with the compositional layout of this drawing, I think the electrical pole working with the the perspective of looking up works well to draw in the viewers gaze and expand into the surrounding area, brimming with trees and grass. I really love how I captured the trees in the centre, hiding the bottom of the wooden poles. I wanted to add lots of detail in the centre of the drawing and limit this as I expanded out. I think the tonal contrast of the trees in the sides of the composition work well to separate from the trees in the centre of the image.
With drawing the trees, I began in the centre, I drew long squiggly shapes representing the branches and the directions they twist and turn. When it came to shading certain areas i would use light cross hatching in areas of the branch shapes I created, building it up for harsher tone. For the two trees in the center, the branches poked out and stuck out more, so I showed this in my outline which helped to differentiate them from the surrounding trees, which didn’t have branches protruding outwards so much. My approach to detail differed among the different trees, keeping trees which were further away less detailed and more a mass of different tones, which again helped to distinguish the different trees from one another.
For the foliage I used blocks of tone to fill up the space and to give it some weight. The blocks of tone helped to convey the light and where it hit the branches and foliage and where it couldn’t reach, again adding to the send of space and weight the foliage takes up. This was easier to do on the other trees further into the background that I did not use much detail for.

Improvements and moving forward.

I am happy with how my observational study of numerous trees turned out. I really love the focal point point of the electrical poles and how to draws the viewers gaze in and helps break up the drawing and composition. I love how I captured the center of the drawing, with lots of detail. However looking back in hindsight I wish some of the areas of tone were harsher in places to really make the position of the trees and its branches pop and stand out a lot clearer. I was to light on the tone in the centre. I liked my approach to the grass at the bottom of the page, but I wish I expanded it out more, especially filling out more of the blank space to the bottom left. I think that would have helped emphasise the perspective I wanted to have for the piece.
Finally, I tried to tackle the outlines of some of the clouds with some loose lines in the sky. I regret this choice and wish I left the sky plain to really emphasise the pen marks for the scene. Pen is a hard medium to use to capture something as delicate as a cloud and I should practice and explore capturing such a shape and subject. Something like charcoal or pastel would work well to capture this, so perhaps I should have combined mediums with charcoal to help add more layers of tone to both the trees and the sky.

I know my next exercise will be looking at capturing clouds, so hopefully I can use that as an opportunity to branch out and explore ways of improving my landscapes and capturing scenes which will involve the sky. I’d like to try a big variety of media for that to really explore how I can effectively capture something as difficult as clouds.

Project 1-Trees

Exercise 1 and 2
Sketching individual trees and Larger observational study of an individual tree.

For this exercise I took myself and some basic drawing supplies to the Lickey Hills, a vast source for a variety of trees. I had a fine liner pen and a pencil to capture the many trees I saw on my walk.

For my first sketch of a pair of trees I used cross hatching and line in an attempt to capture both the basic shape of the tree and the tone. I found this effective in creating a rough texture to the tree without actually defining any texture. For Drawing 2 I kept a focus on the shape and structure of the tree. It helped me to think about the shapes and lines that make up a tree, I feel some branches were too curved and I should use a drawing style that really defines the angles within the branches. I was happy with the outcome. I wanted to try out some sketches with a fine liner pen as its a simple drawing tool I haven’t really experimented with yet and could provide an interesting take on tone by building up layers of tone and cross hatching.

I really preferred using a black, fine liner pen over the pencil, I felt this medium worked better at creating a striking sketch on the page and really emphasised the rough feel of the trees and again really helped to create a rough, uneven texture without any definitive detail. I really love how this came out, I enjoyed playing around with the foliage, using squiggles and cross hatching to hint at and give the leaves a presence while also keeping the focus on the body of the tree, which is what I wanted to do. I feel that this time around I really improved at capturing the twisting shapes of the branches and depicting the trees shape accurately.

Pen drawing 3, looking at unique shapes.

For my third pen drawing I wanted to try something different and came across this broken tree. It was an unusual shape to capture compared to the trees I have looked at previously and I wanted to give it a go. I found the new smooth texture of the wood inside the tree could be depicted by keeping my lines in an upward motion, showing how the texture was smooth in comparison to the tree bark on the outside. I was also now taking the roots into consideration and I found them harder to capture than branches, as it was hard to show them crawling into the Earth, as roots do, compared to how branches flow out into the sky. I feel that aspect of drawing trees could use some work moving forward, but I felt I was ready to tackle Exercise 2 and produce a larger scale drawing of a tree.

Exercise 2- Larger observational study of an individual tree

Large observational drawing of an individual tree (A3)

I decided to go with the composition I looked at with my preliminary sketches with pen drawing 1. I liked the angle from underneath and the sign on the tree, as it hints at the environment which will be absent from the drawing. I began by drawing lines that make up the shape of the tree before adding tone in the form of crosshatching. I kept my tonal approach light when forming the knots present in the tree or places where the bark had fallen off. I decided to try something new that I hadn’t looked at in my preliminary sketches. I layered a squiggly, random pattern on top of the cross hatching in an attempt to depict the texture of the tree bark. I think the pattern does hint at the tree bark texture and a rough texture being present, however I do not think it accurately depicts the texture of tree bark, but rather hints at its presence. I think this still works and adds intrigue into the technical aspect of the drawing. For the foliage, I wasn’t sure what approach to take, but I decided to go with what I used in my preliminary sketches, and kept them loose to create a juxtaposition between the hard, rigid tree and the soft delicate texture of leaves. I think looking back I should have played around with the tonal aspect of the foliage a bit more, adding more areas of darkness to fit into the body of the tree a bit more. My approach to the foliage does however keep the focus on the tree and its textures, but I feel my loose approach makes the leaves feel not as much as part of the tree and in hind sight may not have been the bets approach to take. Moving forward I should really play around with my depiction of foliage, how the light hits it and how it fits into the composition of a tree. With Exercise 3, looking at a group of trees, I should be able to play around with the concept of foliage more and get to a place where my drawings really capture every aspect of a tree. I am very happy with how I have been able to portray the wooden body of a tree and would to be more experimental with my media choice moving forward.

Tutor Feedback-Part 2

I found I enjoyed Part 2 much more than I anticipated and found my drawing skills and development of personal ideas were really starting to grow and flow so much better. I made improvements in key areas such as making my development of ideas into a cohesive journey, fleshing them out and experimenting. I also was able to introduce myself to a broader selection of media and look into how to depict different subject matters, but also how certain media can help visualise certain textures and materials more effectively than others.
From Project 4 Exercise 2 I really learned the value of preliminary drawings and that quick sketches of many viewpoints and options were a great help to developing my ideas into a final drawing, rather than just jumping into creating a drawing head first. As said in my feedback from Hayley, to improve I should spend more time developing the skills exercises are set out to teach me and use thumbnail sketches as a way to do this. I tend to breeze through the exercise in order to develop my personal ideas immediately from the tasks. Moving forward I should take more time to focus on developing the skills these exercises are meant to encourage me to think about in more detail about.

Research and written work is one of my strong points and I should spend a bit more time looking at Artists who both relate to my current work but who I also have a deep interest in. I would love to start finding Artists who really help me to develop and find my voice and truly inspire me how I work. I should look to well known Artists as much as I do lesser known Artists, as they often made the building blocks to certain styles and techniques within their time period and movements.

Project 2 Exercise 2 wasn’t a strong point in the development of my skills. My choice of ink as one of my mediums for this exercise wasn’t the best and ended up creating a flat scene in terms of my use of tone. As suggested by Hayley, I looked into the exercise again and gave it another go, choosing some Starfish to help develop my drawing skills in presenting 3D objects.

First drawing in aqua and blue ink.

For this first drawing I started by using the lighter blue (aqua) ink to draw out the basic shape and add in the areas of tone. This helped to develop a 3D shape before I went on top in a slightly darker blue ink to add details of the texture. I used a brush and watered down the ink to draw the shadows, layering it up as each layer dried to add areas of tone to show the shadows cast by the starfish. I think I have improved in showing the dimensions and shape of objects and how they interact with the light of the environment, by working in layers and building up my tone. I think my drawing style for the texture helped to show the rough texture of the starfish as well as its tonal properties.

Second Attempt

For this attempt I added more layers and worked on a smaller scale which created a darker drawing. I used the same technique of using a lighter blue ink in order to create the basic blocks of tone within the shapes and then layer a darker blue on top to show the texture of the objects. I’m happy with how these came out and think i have improved on making a more dimensional shape, but moving forward I should look at more artists and how the use tone, what techniques they use, and try and look at incorporating that into my work to help me create more realistic objects tonally that fit into the environment of the drawing.

An important point I want to take with me moving forward is how I create my marks and to be more experimentative and creative with making marks tonally and stylistically to experiment further with my personal style as an artist. I want to take my time with exercises and really dive into them thoroughly and try to push the development of my drawing skills even further and improve. With the title of Part 3 being ‘Expanse’ I also want to look at how other artists use their space in their composition and what I can take away from their ideas and techniques to form my own compositions. I’m excited to push forward and really expand on my skills in drawing.

Assignment 2

Ideas and Preliminary sketches

For my assignment I wanted to continue looking into interiors as I enjoyed it and wanted to experiment with it further. With current events I wanted to look into the hospital rooms at my local hospital, where I work. I thought that the rooms had character despite the simple professional look, and how sad and lonely these times can be and the importance of hygiene and health. So unfortunately with my chosen subject matter I had to work from photographs I had taken. I sketched out some possible compositions and tested out whether I wanted to use colouring pencils or oil pastels. I much prefer how my colours came out in sketch [1] however I just though oil pastels would be best with creating a loose fluid style, that shows the rush in a sense of these times. For my composition I ended up settling on sketch [3], although it wasn’t drawn the best I loved the simplicity of the composition, and how everything fell into the tan bit of the wall, and how the sink pops out in the bottom centre. It also portrays the message everyone has been told, to consistently wash our hands, so I thought I would be a good narrative within my composition.

The assignment piece

Oil pastels on toned A3 paper

I think I captured the shapes well in my composition, the colour however I feel I ended up saturating. Its a lot more vibrant and intense than I was expecting, but I think it works well to a certain extent, the shadows can look a bit too much and out of place at times. I like how its loosely blended together with a fluid style that I wanted to achieve, it works well, especially with the posters above the sink. I think I captured the blue one just right to show the washing hands logo, and how the writing isn’t readable but just soft markings. They add to the narrative of rules and regulations of hygiene, especially in a ‘sink’ setting. So I think oil pastels were the right choice for this piece, in order to portray the atmosphere and colours I wanted in a loose fluid style which I’ve grown to love. Looking at the depth of the piece, I think I’ve done well to show my view point of looking straight ahead but could have used some more defined lines in order to show this more effectively.

I am happy with how this came out, I think moving forward and looking at my future assessments, I’d like to look at making something bigger, and by that I mean a series of drawings rather than one. I think this could help me tell a narrative and explore a variety of compositions in an assessment. I think to link them in a colour scheme and using the same techniques for them all would effectively present my ideas and drawings. I’d like to explore more mediums on a bigger variety of surfaces, branching out from just paper and toned paper, and see what effects and textures I can create. Moving forward I would love to be much more experimentive in my choice of media, composition and techniques.

Material Differences

For this exercise I carried on my progress with exercise 2, looking at the stairs but being influenced by Paul Heaston, I wanted to create quite an open view over looking as much of the stairs as possible. I didn’t want as distorted a view as he does, but an open area. Looking at what I ended up producing I think I could have went with a more open view, maybe higher up, but I do like how it is somewhat from a viewpoint that makes the viewer feel a part of the drawing, walking down the stairs.

Oil pastel on A1 paper

As I talked about in exercises prior, I was struggling with blending out my oil pastels, so I tried rubber brushes to help blend and add texture to my medium. I think this technique worked well for the carpet as I swirled it around in order to portray the fuzzy texture of the carpet.
I kept my use of colour as close to the real colours as I could, I think the bannister colours came out really well. After posting this piece online, a lot of the positive feedback was on the bannister and how effective my choice of colours were. I am overall very happy with how this piece came out, I feel I could drastically improve on my use of colour on the plant. It looks too bright and un natural, but as much as I played around with the colours it was hard to tone down the brightness of the green I had already used. Moving forward to avoid this problem I think that I could have a separate sheet of paper on hand to test out my colours before applying them, especially if I am not able to remove or alter them once they have been used.

I am really happy with how this came out and how prepared I was with all the work from the previous exercises. Moving forward I would like to plan out my pieces and really think about my composition and what I would like to portray and although my use of colour in drawings has come a long way, I think I still need to experiment and play around with it some more to really be confident and effective at using it. I think looking into my upcoming assignment, I would like to stick to something similar in terms of my medium, as I would like to practice and get a stronger feel for it, and become confident.

Artist Research- Interiors

Before starting exercise 3 and my assignment, I wanted to spend some time looking at other artists and their approach to domestic interiors. Their focus in the piece, how they use their composition and choice of medium and what the work reflects to the viewer of the scene and what the artists could be trying to say and portray within their work.

Paul Heaston

Paul Heaston- Interior Drawing [1]
Heaston, P. (n.d.). N/A. [Fountain pen on paper] Available at: https://mymodernmet.com/perspective-drawings-paul-heaston/ [Accessed 13 May 2020].

Paul Heaston has a classic yet unique style when it comes to his interior drawings. His composition works hand in hand with his point of view, showing the entirety of his surroundings when he draws, you get that experience of being sat where he’s sat and turning your head to look at everything. It somewhat resembles what a fish eye lens would capture and is very effective for creating an immersive experience for the viewer.
Furthermore his use of line is so effective at capturing the tone and texture of his surroundings, while remaining, again, relatively simple as a technique. He builds up layers of lines, spacing them out or closer together in order to capture tone, and changing the straightness of his lines to create texture, curving them to create the wooden effects as seen on the benches next to him in the scene.
He has a very modern and contemporary aesthetic to his drawings, reflected by his sleek and simple technique of drawing lines and his choice of perspective and medium. It’s stunning to look at, crowded but not distracting. His composition also creates a focus in the centre with how he fades out his drawing as he reaches the edges of the page, it draws the viewers gaze inwards and towards where he is sat drawing, also due to the skewered perception.
His black and white colour palette also helps to create a minimalistic vibe within his work, I feel adding colour would over complicate his style. Examining further, his work is quite relaxing, it’s not too intense and creates a ‘chill’ and relaxed atmosphere and mood overall.
I think moving forward in my own work, I could look into using these techniques of line in order to create detailed but simple drawings. I think this is something I could look at for part 3 of this module, translating this technique for interiors into one for exteriors, as I wanted to experiment more with oil pastels for my last exercise and possibly for my assignment. Looking at later projects too, I would love to experiment with a similar medium, a fountain pen, I love the effect of the lines it creates and the simplicity.

Cecelia Rappaport

Window Light- Cecelia Rappaport
Reference [2]

This piece focuses on a closed off corner of the room, a smaller scale interior piece, but it caught my eye due to the looseness of the medium she used, it relates to my current work and use of oil pastels which I’d like to look at more. Rappaport chose to focus on the window and the light it lets in which works so effectively with her choice in medium, oil paint, as she blocks it in so simple and effortlessly. The colour choice is rather peculiar as none of them seem to go together, creating a lot of contrast but still remaining simple with 3 main colours of green, red and blue, with the creamy, yellow accent colour for a highlight. The piece gives off quite an ambient and calm mood despite the harsh colours. The red throws me off a little, as its such an intense colour that in a way juxtaposes the calmness of the setting. With the lonely setting, it could also be depicting isolation and loneliness, being separated from the outside world, which has since 2020, become a very relevant topic.
I think I can take influence from her loose colour blocked style of drawing, in order to create a sense of atmosphere within my work. I think I could potentially create some interesting textures and use of tone. I think this is a style I could incorporate into my use of oil pastels in order to create a more vibrant, put together interior. I don’t think I’ll use colours that harsh and distracting, but I would like to try being bright, in a realistic, believable way, and create a sense of an atmosphere and narrative, that may not be defined in telling a story but rather setting a scene, as Rappaport does so here.

Moving forward, I would like to take aspects I liked from both artists. Heaston’s dynamic approach to the point of view is something I’d like to incorporate into my composition, but not as wide (or fish eyed). I’d still like a realistic approach to my proportions. Furthermore, I’d like to combine this composition approach with a similar medium style to Rappaports work. I think this could make for an atmospheric drawing that would really draw in my viewers.

References
[1]Paul Heaston Artwork-Heaston, P. (n.d.). N/A. [Fountain pen on paper] Available at: https://mymodernmet.com/perspective-drawings-paul-heaston/ [Accessed 13 May 2020].
[2] Cecelia Rappaport Artwork- Rappaport, C.C. (2018). Window Light. [Oil paint] Available at: http://dailypaintersabstract.blogspot.com/2018/10/contemporary-still-life-painting-floral_5.html [Accessed 13 May 2020].

Quick sketches around the house and Composition- an interior

Exercise 1

For this exercise I began in my bathroom, doing live drawings from different angles in the room, moving around as I quickly sketch what I see in my sketch book. I found it quite refreshing to not be focusing on the detail but my observational skills, quickly depicting the room, the lighting and the shapes that make up the space.

The upstairs bathroom-

I quite liked how these drawing came out, it was a huge change of pace to focus on loose drawings capturing a larger scale still life, a room, and I really enjoyed the process and looking at the different angles. Although I feel in places my proportions are slightly off, I do love the looseness and experimentive markings in live sketching. For the second drawing, I did need to resort to using a photo reference as well for how I wanted the composition to be underneath the viewer to have a better view of the sink and due to the lighting fading in and out.
Because of the type of the type of drawings they are, live sketches, I wasn’t feeling as pressured to make an excellent proper drawing and could really be free with my markings and not worry as much about getting everything perfect. However that’s not to say I wasn’t frustrated looking back when I finished the exercise and seeing the flaws in my proportions and the drawings. It is quite difficult to get the drawings perfectly accurate when trying to keep to a loose carefree style, but I feel my proportions did improve as I moved forward with the exercise.
I attempted these studies around 7pm, since its summer, this meant the sun was slowly setting, beginning to cast long shadows on the walls. This meant I could play around with the drawing tonally and I feel it made my sketches come across more authentic and real in the loose style.
With this exercise I also enjoyed not having to think too much about my composition and setting one up, as the scene had essentially already been made for me, so that meant I could just start sketching away and have the pressure taken off of me in terms of thinking about constructing a composition myself. For this room, I kept to using straight sharp lines to define certain shapes within the room, but kept my markings looser for adding tonal value to the sketches. I decided for my next room study, I could time myself in order to really focus on the shapes of the composition and room, instead of getting carried away with tone, which I tend to do. I wanted to be able to really focus on the shapes.

The kitchen- timed sketches

I found timing the sketch really helped me to focus on the shapes and lines of my drawing, and how effectively I was showing the room, I barely used tone, which was good for me to know I was focused on the area that I wanted to be. For sketch [1] I gave myself 5 minutes to draw, which you think would feel longer than it is, but its a really short amount of time, however, I manged to get in all the details of the oven (loosely).
For sketch [2] I knocked the time down to 2 minutes, I feel the difference is much more noticeable as the proportions for this drawing are a lot more skewered.
My technique became a lot looser, almost like a continual line drawing, with a shorter amount of time to get everything in. I do like the effect to a certain extent but my drawings here look a lot more childlike. I also ended up focusing on a much smaller area of the room rather than a vast corner like previously, i think this due to me trying to fit everything in, but also due to my kitchen not being as open a space as my bathroom. I’m happy with how this came out, as it was just an experiment with capturing a space.
Moving onto my next exercise, I wanted to focus on a more dynamic room composition so I thought my stairs could be a good area to focus in on as there are lots of different angles and perceptions of the composition I could play around with.

Exercise 2- Composition: An interior

For this exercise I decided to focus on my stairs as I can really change my perspective and view as I climb up and down them, which will give me a lot to work with .

I began my studies and preliminary sketches at the top of the stairs, and slowly worked my way down the twists and turns. I kept my observational sketches fluid in order to show the movement and energy of moving up and down the stairs. I found sketches [1] and [2] difficult to capture due to the awkward placing of the bannisters. I think it works well showing the loose shape and composition, I think its interesting to look at.
I decided to try and capture the stairs as a whole before looking at what to really capture within a more detailed drawing.

For sketch [1], I looked at trying to include the whole scene of the stairs, I think where I went wrong was my perception and point of view, I think it was too low down to include everything I wanted to. I also skewered my perception a bit too much to where I couldn’t fit the bannister in right, so I ended up leaving that area blank. I feel this kind of works in the sense of creating a much more open space, rather than a complex one. However I learned from my mistake and altered my viewpoint for sketch [2] and chose a higher point of view. This worked better for fitting in the stairs as a whole and creating a satisfying scene. I then blocked in tone and a bit of texture for the bookshelf, I really love how the bannister and bookshelf came out, they add a bit of character and complexity to an otherwise simple scene. I found preliminary sketches to be quite useful for figuring out and planning a composition, as I feel ready to tackle exercise 3. These exercises were useful in getting me to think about the shapes of a larger scene rather than the intricacies. As planning a larger scale drawing, as these exercises have been leading up to, is about the shapes and the composition, and learning to take time to focus on that has helped me think through what I’m producing more.
Moving forward I think I’m ready to begin adding colour and texture to my chosen composition.

Design a site like this with WordPress.com
Get started